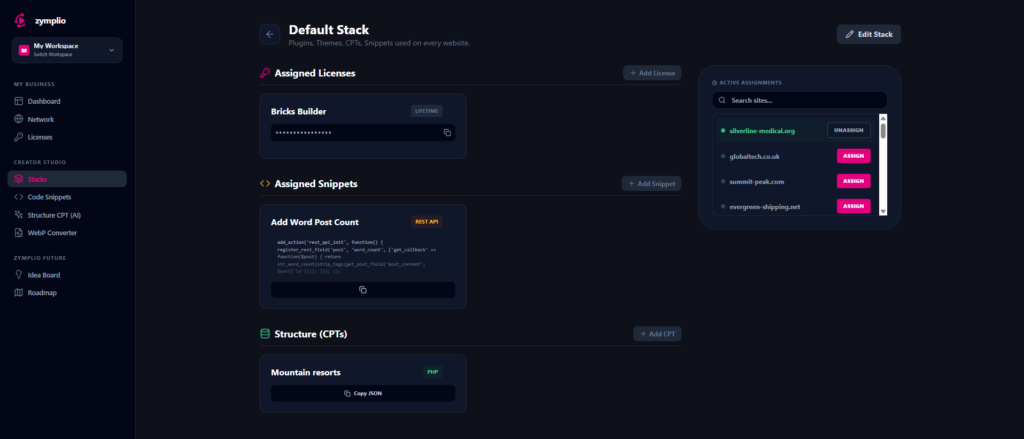

A Stack is the ultimate productivity tool in zymplio. Instead of managing individual plugins or snippets, you bundle them into a high-performance package. Think of a Stack as a “pre-packed suitcase” for a specific type of website project.
1. What is inside a Stack?
A Stack can contain three types of assets:
- Licenses: Your standard set of plugins (e.g., Bricks Builder, ACF Pro, SEOPress).
- Code Snippets: Your favorite CSS, PHP, or JavaScript functions that you use on every site.
- Structure (CPTs): The database architectures you created with the AI Architect.
2. Why use Stacks?
- Rapid Deployment: When you start a new client project, you don’t have to assign 10 different licenses and 5 snippets manually. You just assign one Stack, and everything is linked instantly.
- Standardization: Ensure that every “E-Commerce Site” or every “Real Estate Landing Page” your agency builds has exactly the same high-quality foundation.
- Cloud vs. My Stacks: You can create your own private Stacks (“My Stacks”) or explore “Cloud Stacks” shared by the community to get inspired by professional setups.
How to build and use a Stack
Step 1: Create the Bundle
Go to the Stacks department in your sidebar and click “Create Stack.” Give it a name like “Standard Business Foundation” or “Advanced Shop Setup.”
Step 2: Assign your Assets
Open your new Stack and use the “Add” buttons to pick items from your Vault. You can also create new licenses or snippets directly from within the Stack view.
Step 3: Deploy to Sites
On the right side of your Stack view, you will see the Site Selector.
- Simply select the WordPress sites where you want this Stack to be active.
- zymplio will automatically link all the plugins, snippets, and structures in that Stack to the chosen sites.
Step 4: Push to WordPress
Once a Stack is assigned to a site, use the “Sync Now” feature in the Network Hub. The zymplio Bridge on the WordPress site will then “pull” the entire Stack configuration and activate everything in one go.